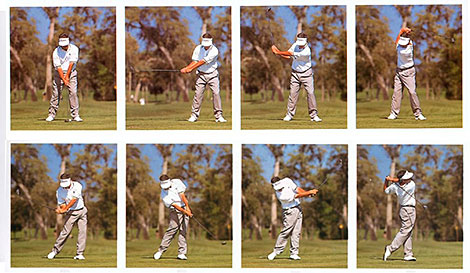
Do you want a simple and low-tech tool that can help any young pitcher improve their delivery? If you answered yes, try making a Kinogram. They are simpley a sequence of pictures taken at specific points in time of, in our case, a pitcher throwing a baseball. The golf world has used them forever. I can remember trying to copy Fred Couples swing from a magazine my dad had lying around the house when I was a kid.
Even in a world where we can get slow-motion bio-mechanical breakdowns with quantifiable kinematic and kinetic data all in your pocket, I still think that an “old-school” Kinogram can help a lot. Sure it has its limitations which I will point out, but when it comes to pitchers getting information that they can understand with both their developing brains and bodies, I’d put Kinogram’s near the top of my “useful tools” list.
Here’s what you can expect to learn about Kinograms in this article
- What’s a Kinogram?
- Why are Kinogram’s useful?
- How to make your own Kinogram?
- What are the limitations of Kinogram’s?
What’s a Kinogram?
The Kinogram has been around since the 1880’s. That’s right around when baseball was just starting to take off. It’s how researchers began to study movement when taking still pictures was considered high-tech.
Kinogram’s are NOT a series of pictures taken at regular time intervals. They are a sequence of pictures taken when an athlete hits a certain mechanical landmarks.
Here are the landmarks I use, I’ll explain each one later
- Peak knee lift
- Drive Phase (foot under lead hip)
- Just Prior to Front Foot Contact
- Front Foot Contact
- Max External Rotation
- Ball Release
- Follow Through
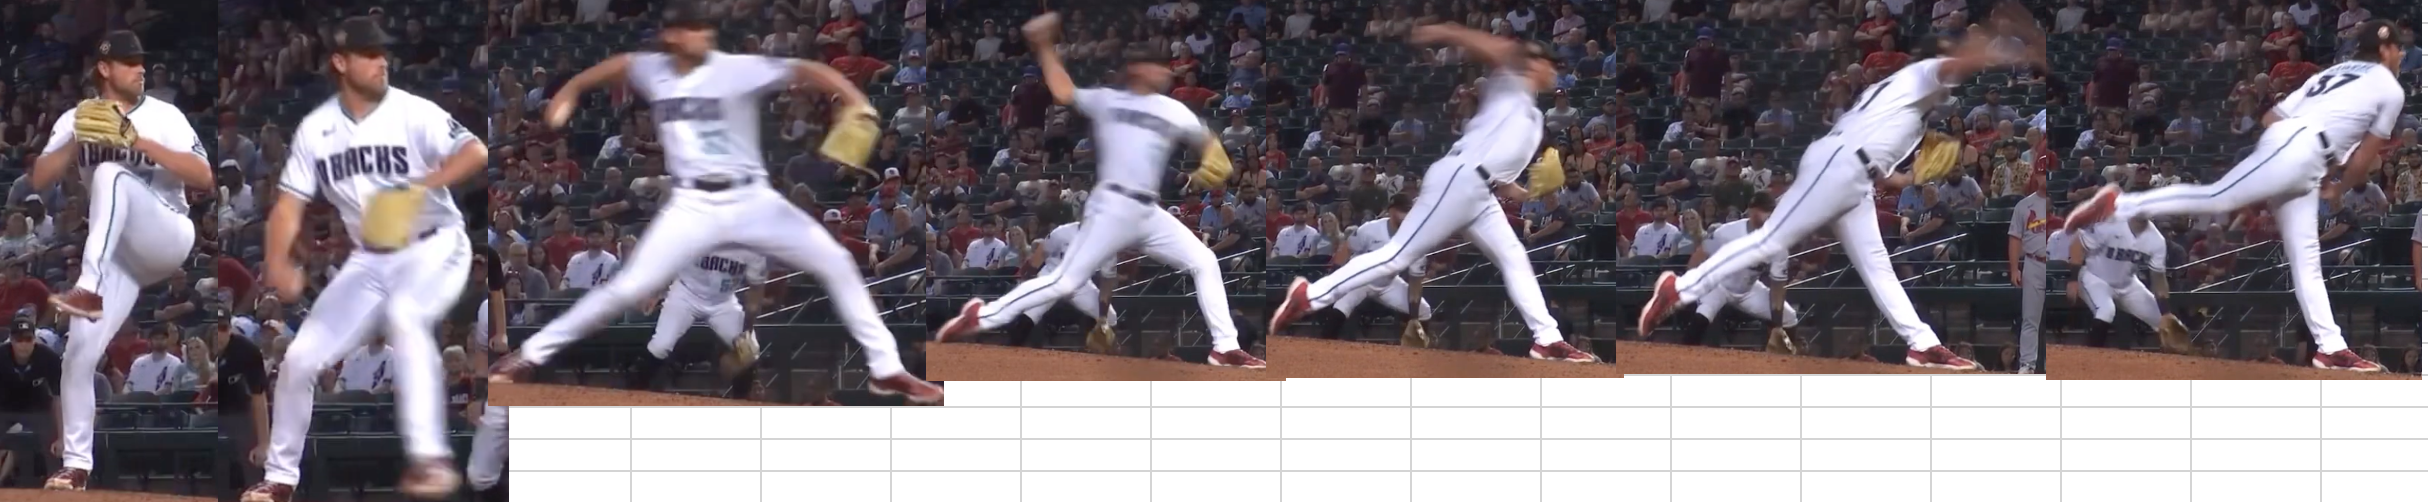
Here’s what Paul Skenes Kinogram at LSU looks like:

I was exposed to the term “Kinograms” when I downloaded an e-book by Stu McMillan and Dan Pfaff from Altis. These are two of the top track and field coaches in the world. Their e-book, which I highly recommend, shows you how to build a kinogram for sprinting. https://altis.world/kinogram-method-ebook/
Why Are Kinogram’s Useful?
The low-tech aspect of a kinogram is exactly what makes it a useful tool. It’s so low-tech that our caveman brains can understand what we are looking at, the shapes that we want to produce with our bodies to optimally throw a baseball.
Shapes are intuitive and don’t require a deep understanding of pitching mechanics and human anatomy. We can show a pitcher what they look like at key points of the delivery and let their natural abilities and athleticism decide how they go from point A to point B to point C and so on. The pictures they’ll see are very informative yet not overwhelming.
If they aren’t making the shapes that we want to see we can compare their kinogram to that of a high level pitcher. We can easily point out the differences that might be holding them back. It’s like one of those “can you spot 5 differences” kind of pictures we give to young children.

Now I want to take the time to stress that I don’t think every pitcher should try to copy what another pitcher looks like. This is especially true if you are trying to compare yourself to an MLB pitcher with a completely different body type. But even if you found a good comparable, your kinogram wouldn’t and shouldn’t look the exact same since there are a lot of different ways to throw a ball really, really, really hard.
WIth that being said there are some biomechanical principles that must be met to achieve elite levels of throwing velocity. Kinogram’s serve as a great screen to identify mechanical inefficiencies, if you know what you’re looking for. This will the topic of a future article.
How to build a Kinogram?
Building a Kinogram is simple and I recommend that you get the pitchers themselves to build their own following these simple instructions. This will save you a bunch of time and provide your athlete’s with a deeper understanding of their mechanics.
Take a slow motion video of each pitcher from the side. The number of frames per second will play a big role in picking your exact picture that you use for each point in the delivery. For now we will just use this one angle from the side as it’s the easiest for everyone to get on the same page as to exactly when these key points of the delivery happen thus increasing the reliability of this tool.
Let’s use Kevin Ginkle as an example.
Peak Knee Lift: This one is simple. Take a screenshot when that lead leg has stopped moving upwards.

Drive Phase: When the front foot just starts to get ahead of the front hip.

Max Lead Leg Distance: Once the front foot has reached its max distance going towards home plate while the foot is still in the air. Just prior to front foot contact.

Front Foot Contact: At or slightly after the front foot touches the ground and bears some body weight.

Max External Rotation: Since the arm moves so fast it will be difficult to determine the exact point in time that the shoulder reaches its max external rotation. In fact, the arm will look like a blur. Just do your best to finding the frame when the arm has stopped rotating externally before it bounces back to internal rotation.

Ball Release: Another one that is hard to capture the exact milli-second of when you stop touching the ball. Again, do your best.

Follow Through: When the throwing arm reaches its max follow-through (internal rotation) before it recoils

Arrange these pictures going left to right for a righty or right to left for a lefty.
The finished product looks like this:
What are the limitations of a Kinogram?
Looking at still pictures has two obvious limitations
- Timing/Rhythm/Tempo
- Two-Dimensional Analysis
#1 . The timing or rhythm or tempo of the delivery is vital. How we flow from one position to another is key.
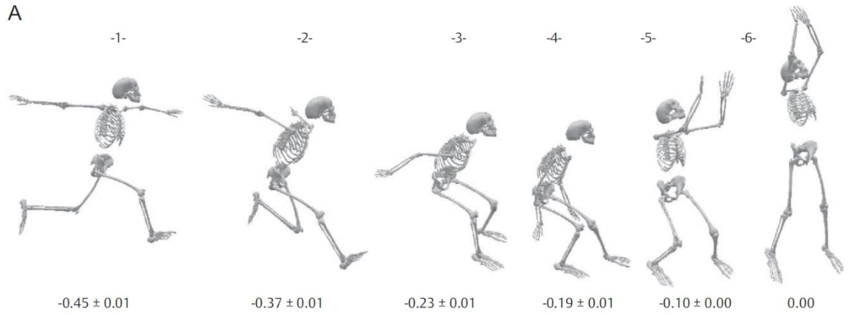
One way you can combat this is with a timestamp. In this graphic below we see a skeleton kinogram of a volleyball approach jump. The timing between the last two steps has to be quick in order to maximize the stretch shortening cycle to optimize jump height. This time-stamped kinogram provides us with the data that the time between the last two steps (#3&4) is only 0.04 seconds. Whereas the time between the 1st and 2nd step is 0.23 seconds (picutres #1 & 3). If we only looked at “normal” kinogram we wouldn’t have any idea of the tempo they are using.
This obviously requires a step up in terms of technology but it can be solved. Counting the frames between each picutre is a great option.
#2 – Using a two-dimensional tool to solve a problem that exists in all three planes has its obvious limitations. To solve this problem we can make another kinogram taken from a different angle. Looking at a pitcher from the rear can provide a lot more information. If we can pull out a step ladder and get an aerial view then we are really cooking. Sync those cameras up and you’ve got yourself a comprehensive 3-D model of your pitcher. This of course requires some more set-up and technology but again nothing too extreme or expensive.
Wrap Up
Kinograms are awesome because they work on the same level as our brain. Shapes are easy to see and understand providing a ton of information while not overwhelming young athletes.
Their simplicity is another key factor. You don’t need any expensive equipment or tech-skills. The fact that a teenage kid can do this on their own is amazing. The act of building their own kinogram will give them a much better understanding of their own mechanics. Future kinograms can be stacked on top of one another to see what progress has been made.
I hope that you found this information to be useful. Be on the lookout for Kinogram’s of different MLB pitchers of all sorts of shapes and sizes.
Thanks,
Graeme Lehman, MSc, CSCS

Leave a comment