Weighted jumps are a great tool to help build out some key parts of this physical profile concept. Plus they’re an awesome training tool that can help increase the amount of power that our athletes can produce in a safe manner. It’s awesome anytime we can pick an exercise that kills two birds with one stone saving both time and energy.
First, let’s talk about why they’re a great training tool before we get into the profiling part of the conversation.
To start, weighted jump performance has been correlated to athletic performance with tests like the vertical jump as well as 10 and 20-meter sprint times (proof, proof, proof). This should be enough reason to put them into your training but I will keep going on in case you aren’t convinced.
Weighted jumps as you will see in the force-velocity graph below fall between the “strength-speed” and the “Power” sections on the curve. This “Power” section on the curve relates to a sweet spot where we can produce the most, you guessed it, power. Remember that power is the product of Force x Velocity and when we use weighted jumps we have the ability to display the highest amounts of power compared to any other type of training. When we look at heavy squats, for example, they have lots of FORCE but very little VELOCITY whereas plyometrics or jump training has lots of VELOCITY but very little FORCE which causes both types of training to come up short when we measure how much POWER they produce.
So just how Powerful are Weighted Jumps?
Here is a link to a study that had subjects produce upwards of 5783 Watts with weighted jumps while this study was a bit more modest but still had subjects pumping out 4600 Watts. This might not mean much to you until you realize that elite-level Olympic lifters who have spent years perfecting their technique and weighed around 220lbs produce 4700 Watts while other studies have shown numbers more in the 4200 and 4300 Watts range.
How to Do Them
Basically, you just jump with an extra weight loaded onto your body. Ironically jumping with weight is how Olympic lifting is often described when coaches tell you to “triple extend” through the hips, knees, and ankles. The two most common methods are either using a bar across your shoulders (back or front squat) or holding the weight in your hands like dumbbells or a hex bar. The only risks that are associated with weighted jumps are during the landing because of the extra stress. Be sure to practice these with lighter loads but they’re very easy to learn and get used to which again makes them superior to Olympic lifts.
With the weights in your hands, it’s easier to decelerate and it has also been shown to outperform weighted jumps when the bar is on your back in regards to the amount of power being produced, this study again. By having the weight on your shoulders your center of gravity is higher making the landing a bit more difficult plus your neck/spine has to absorb the weight of the bar. It’s still a practical exercise but it just takes a bit more skill.

Here is an example of what I am talking about; two different types of loaded jumps. This one above is of Isaac Greer who can throw in the mid-’90s and was once ranked #31 on Baseball America’s players to watch at the JUCO level. I’ve had the pleasure of training him both in-person and remotely since he was 14 and he has served as a guinea pig for me multiple times. Here he is doing a weighted jump with 95 lbs. In his defense, this was the first time we had done this type of drill so he was still getting used to it.
Next is a Hex Bar jump demonstrated here by the Toronto Blue Jays Nate Pearson who can reach triple digits!!!

This looks a lot smoother but that might be due to the fact that this wasn’t his first time doing this. I have this video because he, along with his teammates at the College of Central Florida, were asked to submit a video of their training during the winter break. So he had performed this exercise a bunch of times under the supervision of his coaches. My only contribution was putting the program together and even though I was literally thousands of miles away from these guys I felt comfortable with them doing this simple exercise so I didn’t think twice about adding in to the program.
How Much Weight
Depends on your goal because of the principle of specificity. This means that if you want to get better at moving faster with lighter loads then this is how you should train. In this study, they found that when subjects trained with weighted jumps that were only 30% of their 1RM squat they reduced their 20-meter sprint times. While the group that trained using weighted jumps with 80% of their 1 RM ran slower times compared to the testing at the start of the study.
This isn’t to say that heavy jumps are bad once you get used to them since I think they can play a pretty significant role in helping develop the kind of lower body power that we can use on the mound. After all, we are starting from a complete standstill on one leg which to me means that heavier jumping loads have their time and place. This is especially true if you need to specifically develop this kind of strength.
But how do you know if you need this type of strength? You test it of course!! This leads perfectly to my favorite aspect of weighted jumps and that’s the profiling aspect.
Jump Profiling
By measuring your jump height with a wide range of loads you can cover most of the force-velocity curve. From here you can compare these jumps to one another to see what your profile looks like. I’ve mentioned the MyJump app before as being the best $7 I’ve ever spent but it just keeps getting better. The app can do all the math for your which is backed up by study after to study to give you an accurate profile. Depending on your results you might need to spend more time getting faster by developing your velocity or you might need to spend time getting stronger to increase your force.
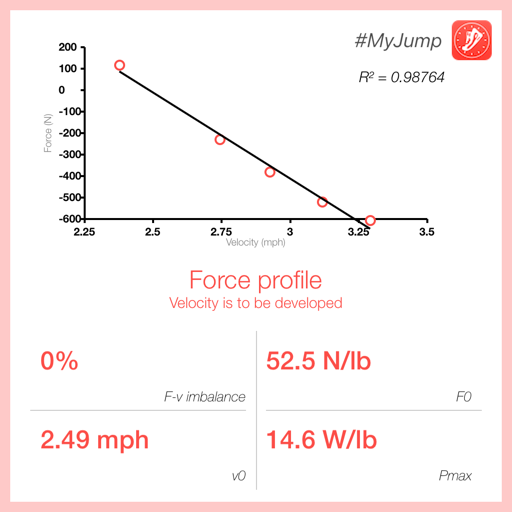
Here is what Isaac’s jump profile looks like with a set of 5 jumps with different loads.
17.9 Inch Jump with No Load

15.6 Inch Jump with 25lbs

This one isn’t quite the same as the others since it is a ball rather than a bar or a stick and if you watch closely you can see him drive the ball up with his arms which might have bought him a little extra force. But I wanted something to fill the gap between the non-loaded jump and the 45lbs bar seen here.
13.7 Inch Jump with 45 lbs

12.1 Inch Jump with 65 lbs

9.1 Inch Jump with 95 lbs
When you plug this info into the My Jump App here is the printout you get that graphs these jumps with the insight as to what should be trained. This printout has a lot of cool information like how much force is being produced and how fast the athlete is moving but the main takeaway here is that it spells it out for you what the athlete needs. And in this case, it clearly says “Velocity is to be developed”.
I am still trying to learn this stuff a little better myself but it’s great that it tells you exactly what needs to be done. If you want to learn more about interpreting these results check out this study.
These results make sense to me because this kid loves the weight room and hasn’t gone more than a couple of days in a row without going to the gym since I’ve known him. As a result, I’ve been trying to help him develop more speed since he is “strong enough” with some fancy training programs like French Contrast Training and Tri-Phasic methods that aren’t for everyone but can help those that have a solid foundation of strength.
This approach of prescribing exercises based on what the athlete needs based on their profile has been shown to work in research. This is one of the better studies that I have read in a while since it took a customized approach rather than splitting subjects/athletes into two groups, control and experimental. In this study, they still used a control group but the experimental group was split into different groups based on the results of their vertical jump profiling. After each athlete was profiled at the start of the study the subjects that needed to work on more velocity were given a training program with more speed and speed-strength exercises while those that were deemed “force deficient” were given a program with more strength and strength-speed exercises.
But did it work? It did work and the results were amazing!! In the experimental groups, all 46 subjects improved their vertical jumping ability while those that weren’t given customized programs only had 18 out of 38 subjects improve their scores with a “cookie-cutter” program.
This shows how powerful this type of assessment can be and how it can help you make the most out of your time and energy. This was the same type of idea that I was trying to describe in my Elasticity articles, here and here, when we look at the difference between drop jumps, countermovement, and squat jumps.
How does this relate to pitching?
Once you have this information what do you do with it? Do you try to sure up your weakness’ or do you fortify your strengths? When it comes to training in the gym the above study shows pretty clearly that you need to focus on the area in which you’re deficient but when you’re on the mound you must rely on your strengths. I would suspect that the athletes who are strong but slow would benefit from more of a drop n’ drive style of pitching and vice versa. But if an athlete works on changing their profile they would also need to adapt their mechanics as time goes on to take advantage of their physical abilities and attributes.
All very complicated things I am still trying to wrap my head around.
In keeping with my goal of trying to keep this under 2000 words, I will end things here before coming back with the next installment in this series when we talk about speed strength.
Graeme Lehman, MSc, CSCS

Leave a comment